Subject:
|
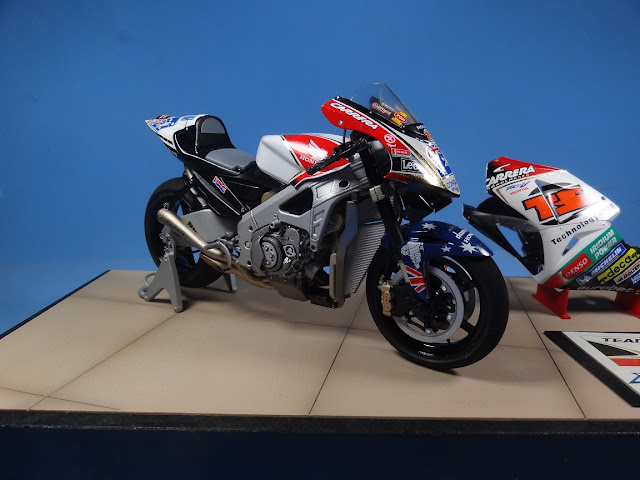
Honda RC211V 2006
|
Scale:
|
1/12
|
Manufacturer:
| Tamiya |
Price
|
US$ 25,00 plus shipping
|
Description
|
Injected plastic model with waterslide decals, ruber tires and some other details
|
Comments
|
This is Tamiya's 1/12 scale Honda RC211V model 2006. What a great kit! Detail is fantastic and fit is above standard. Working with several shades o metallic colors made the kit very interesting. Casey Stoner's racing colors added an extraordinary look at the finished model. The only difficulty i had was trimming the decals to fit over the angles of the frame. Lots of setting solution were needed, something i think would make this fantastic kit unfit for the beginner but certainly a pleasure for the average modeler!
|
Friday, November 30, 2018
Racing Vehicles vol.1: Honda RC211V 2006 Casey Stoner
Sunday, November 25, 2018
Work in progress vol.26: Honda RC211V 2006
Subject:
|
Honda RC211V 2006
|
Scale:
|
1/12
|
Manufacturer:
| Tamiya |
Price
|
US$ 25,00 plus shipping
|
Description
|
Injected plastic model with waterslide decals, ruber tires and some other details
|
Comments
|
This is Tamiya's 1/12 scale Honda RC211V model 2006. What a great kit! Detail is fantastic and fit is above standard. With these pictures you will see some captions describing details of the construction. I hope you will enjoy it!
|
 |
| The engine fully assembled. It is a kit by itself! |
 |
| The main aluminium body of the bike with the engine in place. |
 |
| The engine is firmly placed in it's position with tiny bolts. |
 |
| Some details were hidden by the frame, but the hole structure looks really nice. |
 |
| The rear suspension added to the body frame. |
 |
| The rear bumper can be seen with the metal coil in place. |
 |
| The front wheel with the brake disks. Very nice details here! |
 |
| The body frame and rear suspension with the rear wheel in place. |
 |
| Same part of the construction seen from the opposite side. |
 |
| The front suspension almost ready. Look at the brake detail! |
 |
| Dry fitting of the main components! |
 |
| The fuel tank and the engine exhaust in place. |
 |
| The bike is rady. Most of the parts missing are from the aerodynamic frame. |
 |
| Radiator and water pump blocked even more the view of the engine, but there are still a lot of details to be seen! |
 |
| The bike stands firmly over the rear support. It is a nice way to work with the kit and avoid damage by placing it on it's side. |
 |
| Several small parts of vinyl tube were used for the brake lines. |
 |
| The exhaust was painted with Alclad II jet exhaust to increase the number of metallic shades. |
 |
| Upper view of the kit showing fuel tank details. |
 |
| Here are some body cover parts already painted and finished in high gloss texture for the decals |
 |
| The side panels also painted and waiting for the decals. |
 |
| The fuel tank in place with the decals. Good fit made possible to get the decals in place before gluing the tank to the bike. |
 |
| I decided to leave the side panels and the bottom cover out of the finished bike to show all the details. |
 |
| Casey Stoner racing colors are fantastic and give a nice touch to the finished kit! |
Subscribe to:
Posts (Atom)


